一,背景
这次文章主要解决以下几个问题:
- 什么叫 Github Actions?它解决什么问题?和同类型工具相比它的亮点在哪?
- Github Actions 整个使用流程
- yml 文件编写
首先我们要知道,编写程序代码只是互联网开发的一部分,我们写完代码之后,会经过集成、交付、部署以完成一个项目。(粗略地说:我们要把我们负责的代码提交到主分支,然后将更新的项目放到服务器上呈现给用户)
这里我们要明白几个术语的意思:
开发环境:我们在自己计算机上写代码时的操作环境,比如我们 vite 本地开启的服务器等。
测试环境:一般也是一台服务器(和生产环境是相同的配置,只是目的是为了测试),正常企业会将写好的代码部署到该服务器上,测试它在正常使用时的情况。(为什么有测试环境:因为我们不能直接将代码部署到生产环境中,如果代码运行失败,那我们的网站相当于出 bug 了,用户都使用不了了)
生产环境:一台服务器。如果测试环境代码运行成功,就会将代码部署到这台面向客户的服务器。
持续 xxx:意思就是说频繁地进行某件事,少量多次,为了防止出现一次干了太多导致找不到出错在哪。
持续集成:少量多次将自己负责的代码分支写好之后提交到主分支。
持续交付:频繁地将持续集成的项目代码给到测试团队进行测试评估。(对应测试环境)
持续部署:频繁地将测试团队测试没问题的代码部署到生产服务器中。(对应生产环境)
持续集成也是集成,只是少量多次而已,不要误解。
二,Github Actions 简介
自动化部署工具+脚本市场(Github Actions Marketplace)。
我们的集成交付部署需要手动写很多 bash 脚本,而很多项目的脚本很多都可以共用或者说很相似,完全可以整一个模板或者脚本库,想用啥直接获取而不是自己手写。
而 github actions 就将代码仓库的逻辑代入到部署的 bash 脚本上,用户可以提交脚本文件到代码仓库,形成一个市场,其他开发者可以直接在市场上找现成的脚本,引用他们的脚本。(当然你也可以自己写,没问题,github actions 本身有自动部署功能)
当然我们一般喜欢用官方的脚本(actions):https://github.com/actions
而之前流行的 CI(持续部署的英文缩写)工具并没有 market 的功能:Travis CI
三,操作流程
基本的流程如下:
- 首先我们要在项目根目录新建.github/workflows 目录。
- 新建一个 yaml 格式的文件,后缀名为.yml,名字无所谓。(github 发现了 yml 文件会自动执行该文件,当然你也可以写多个 yml 文件)
- 使用 yml 语法书写配置该文件,通过 uses 引用脚本市场的脚本(怎么引用每个脚本里都有教学)。
- 如果我们有一些私密变量,比如 github 密钥或者服务器的一些密钥,这些高危信息要放在 github 仓库的Settings/Security/Secrets/Actions里,在 yml 文件里引用的方式是$。
流程中最重要的一步就是第三步:配置 yml 文件
四,一个简单的实例:部署到 github pages
这里我用 Vue 初始界面部署到 github pages 为例。
仓库地址:https://github.com/mlhiter/github-actions-test
网页查看地址:https://mlhiter.github.io/github-actions-test/
1.创建 Github 令牌(一个用来登录 Github 仓库的密钥),并且将密钥存储在我们测试项目的 Setting/Security/Secrets/Secrets and variables/Actions 中(新建一个 repository secret 就可以)。(创建简单的说就是在你头像那里的 Settings/Developer Settings,然后新建一个 Personal access tokens/Tokens(classic))
repository secret 和 environment secrets 的区别:
- repository secret(库密钥):你在存储库的任何文件都可以应用该变量密钥。
- environment secrets(环境密钥):专门针对 github actions 的密钥,只能在 yml 文件里使用。
使用方法就是通过你存储的键值对中的键访问,比如我用 ACCESS_TOKEN 来访问。
2,本地创建 Vue 模板项目并且配置文件
npm create vite@latest
Github Actions 使用这个现成的:Deploy to Github Pages
在.github/workflows 文件夹下新建一个文件(文件名任意.yml),输入上面 actions 网页的示例内容。
Github Actions 一些基本概念:一个文件就是一个 workflow(工作流),一个 workflow 包括一个或者多个 jobs(任务),一个 jobs 包括多个 step(步骤),每个 step 包括多个 action(命令)。
name: Build and Deploy #工作流的名字,如果省略则默认是文件名
on: #指定触发该workflow的条件,这里是当main分支push之后,这里也可以是事件的数组(数组里的项都能触发workflow)
  push:
    branches:
      - main
permissions: #对workflow授予权限,这里是授予对仓库内容的写权限(因为github之后需要创建一个新分支,将build后的代码放在那个分支上)
  contents: write
jobs: #这里就是工作流
  build-and-deploy: #构建和部署,这只是一个job的名字,随意
    concurrency: ci-${{ github.ref }} #这里是连续多个部署可以开启,默认是使用的
    runs-on: ubuntu-latest #指定运行所需的虚拟机环境:必填,这里的是linux-ubuntu系统
    steps:
      #通过-分开每个step,这里是三步:获取源码、安装依赖并构建、部署
      - name: Checkout
        uses: actions/checkout@v3 #通过uses使用市场现成的包,这个包是获取到仓库源码。

      - name: Install and Build #npm ci和npm install都可以用来安装依赖,但是ci旨在用于自动化环境,例如测试平台、持续集成和部署或者你希望对依赖项进行全新安装
        #run里是终端里执行的命令
        run: |
          npm ci
          npm run build

      - name: Deploy
        uses: JamesIves/github-pages-deploy-action@v4
        with:
          folder: dist #构建好的文件夹位置(我们的vue项目会生成一个dist文件夹,然后github会将生成的这个文件夹的内容拿出来放到下面的BRANCH分支上)
          ACCESS_TOKEN: ${{ secrets.ACCESS_TOKEN }} #github密钥
          BRANCH: gh-pages #构建好文件夹放在哪个分支上,
这里几个注意问题:
- 必须在本地安装一下依赖生成一个 package-lock.json,否则 npm ci 会失败。
- 构建文件夹要改一下,默认是 build,但是我们 vite 默认是 dist
- vite.config.ts 里在 plugins 下面加一个配置项:base:‘/仓库名/‘
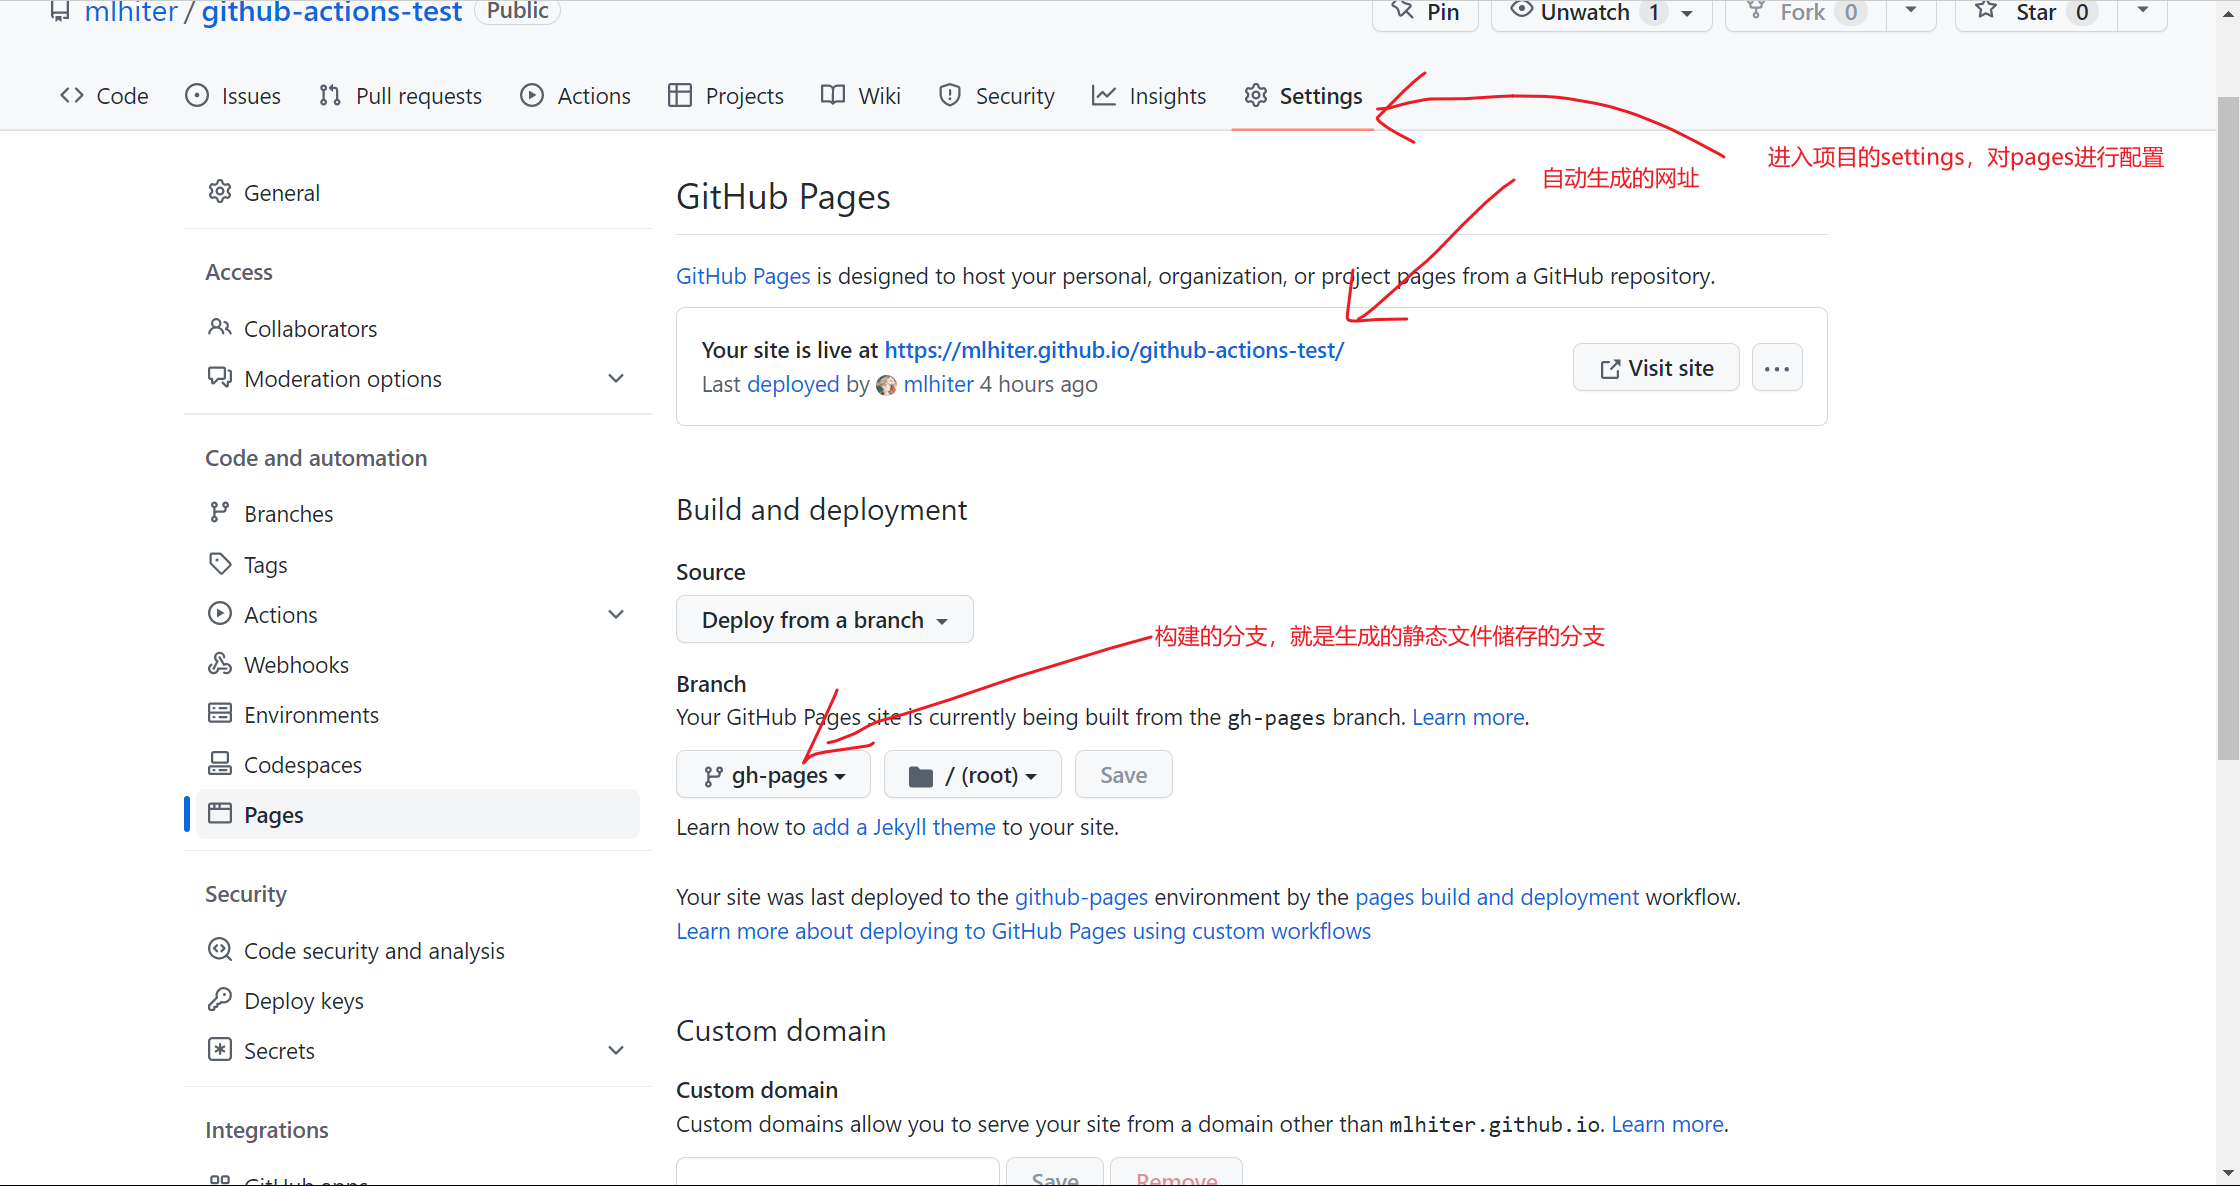
写完代码上传之后,可以看这里查看到一些细节。当然我们要看一下 Pull requests 右面的 actions 看我们的持续部署是否成功。
之后就可以去生成的网页里去看看啦。😀

五,进阶版实例:部署到阿里云服务器
# This is a basic workflow to help you get started with Actions

name: Build and Deploy to Server

# Controls when the workflow will run
on:
  # Triggers the workflow on push or pull request events but only for the master branch
  push:
    branches: [develop]
  pull_request:
    branches: [develop]

  # Allows you to run this workflow manually from the Actions tab
  workflow_dispatch:

# A workflow run is made up of one or more jobs that can run sequentially or in parallel
jobs:
  # This workflow contains a single job called "build"
  build:
    # The type of runner that the job will run on
    runs-on: ubuntu-latest

    strategy:
      matrix:
        node-version: [16.x]
        # See supported Node.js release schedule at https://nodejs.org/en/about/releases/

    # Steps represent a sequence of tasks that will be executed as part of the job
    steps:
      # Checks-out your repository under $GITHUB_WORKSPACE, so your job can access it
      - name: Checkout
        uses: actions/checkout@v3

      # Install Node.js
      - name: Install Node.js ${{ matrix.node-version }}
        uses: actions/setup-node@v3
        with:
          node-version: ${{ matrix.node-version }}
          # cache: 'npm' # use pnpm instead of npm

      # Install pnpm
      - name: Install pnpm
        uses: pnpm/action-setup@v2.2.1
        id: pnpm-install
        with:
          version: 7
          run_install: false

      # Cache
      - name: Get pnpm store directory
        id: pnpm-cache
        run: |
          echo "::set-output name=pnpm_cache_dir::$(pnpm store path)"

      # Cache
      - name: Setup pnpm cache
        uses: actions/cache@v3
        with:
          path: ${{ steps.pnpm-cache.outputs.pnpm_cache_dir }}
          key: ${{ runner.os }}-pnpm-store-${{ hashFiles('**/pnpm-lock.yaml') }}
          restore-keys: |
            ${{ runner.os }}-pnpm-store-

      # Install dependencies with pnpm
      - name: Install dependencies
        run: pnpm install

      # Build with pnpm
      - name: Build vue3.x app
        run: pnpm run build

      # SSH deploy to aliyun
      - name: SSH deploy to aliyun
        # You may pin to the exact commit or the version.
        uses: kostya-ten/ssh-server-deploy@v4
        with:
          # Host
          host: ${{ secrets.REMOTE_HOST }}
          # Port
          port: ${{ secrets.REMOTE_PORT }}
          # Username
          username: ${{ secrets.REMOTE_USER }}
          # Password
          # password: ${{ secrets.REMOTE_PWD }} # optional
          # Private key
          private_key: ${{ secrets.PRIVATE_KEY }}
          # Before script
          # if [ ! -d ${{ secrets.REMOTE_PATH }} ];then mkdir ${{ secrets.REMOTE_PATH }};el
          before_script: |
            if [[ -n $(ls ${{ secrets.REMOTE_PATH }}) ]];then rm -r ${{ secrets.REMOTE_PATH }}/*;fi
          # After script
          after_script: nginx -s reload
          # After script
          scp_source: ./dist/*
          # After script
          scp_target: ${{ secrets.REMOTE_PATH }} # /var/www/squint/
参考资料
- github actions 官方文档:https://docs.github.com/zh/actions/quickstart
- github actions 入门:https://www.ruanyifeng.com/blog/2019/09/getting-started-with-github-actions.html
- yaml 教程:https://www.ruanyifeng.com/blog/2016/07/yaml.html
- 持续集成是什么:https://www.ruanyifeng.com/blog/2015/09/continuous-integration.html
- 如何理解持续集成、持续交付、持续部署:https://www.zhihu.com/question/23444990
- npm ci 和 npm install 的区别:https://blog.csdn.net/w20101310/article/details/120627875

